A lot of people are still asking about how to handle online tutoring/remote teaching. Shortly after our state went into quarantine in March 2020, I wrote on Facebook about how my daughter’s tutor was working with my daughter. They’re still doing it the same and it’s very effective for us. As a matter of fact, I anticipate we will continue online tutoring even after life returns to “normal” simply because it saves us a long drive for each tutoring session.
I have edited and pasted my initial Facebook post below to give parents, tutors, and teachers ideas they may wish to incorporate into their remote learning sessions. I’ve also added additional ideas on using decodable books remotely as well as how to add in fun activities. Our homeschool co-op has been meeting virtually so I have taken ideas from classes I’ve taught as well as classes my daughter has participated in and applied them to my materials.
VIRTUAL TUTORING BASICS
Although this is written for 1:1 tutoring, you could adapt this to teaching/tutoring groups.
Because my daughter is homeschooled, I am experienced at having my child take online classes. If you are just starting out with online teaching, your best bet is to keep this simple. If you are not a technology pro (yet) I would advise against buying or using anything technological except your computer and a webcam. My kids have taken many Outschool classes. Sometimes the teachers have dedicated cameras for showing how to make a craft project. Other times they use powerpoint or share YouTube videos. In time you may find you want that, but don’t worry about it to begin with.
Since my daughter has taken many online classes via Outschool, she did not have a learning curve for working with her tutor online. However, after talking with the tutor about younger students that have not done online interactive classes, my advice was to start with fifteen or twenty-minute sessions until the kids can figure it out. If you are feeling stressed by online tutoring, you may find it helpful to start with short sessions as well until you figure it all out. Your learning curve will go up quickly as you interact with many kids. (If you’re a teacher, you likely don’t have that luxury. Just know you will figure it out.) You can also spend the first couple sessions playing games so that the kids (and you) aren’t trying to learn both virtual learning AND content.
OUR TUTORING EXPERIENCE:
I SUPPLY…
- A computer with a webcam.
- A small (about letter size) white board with dry erase markers and eraser.
- Writing paper and pencil.
- Books for my daughter to read. Because my daughter is reading my not-yet-published books, I email the tutor PDFs of the books they will read together and print out copies for my daughter. If your students are reading paper copies, you will need to make sure you and your students each have a copy of whatever you want them to read. If you are screensharing what they will read, then you will need to have digital materials available and set up a screenshare.
- The tutor emails me any worksheets they will be doing together and I print them.
- I have this letter tile website on my phone, but it could be used on most device your students’ families have.
For the actual session, the teacher sends us an online invitation. My daughter already knows how to use the platform, so this is easy. You will need to make sure the parents can get and figure out whatever platform you decide to use.
During the tutoring sessions, the tutor presents new information, has my daughter fill out the worksheets I’ve printed or she writes words or sentences on either the white board, the notepad, or the letter tiles on my phone. When she is done writing, she reads them to the tutor. Then she says how she spelled each word. After that she holds it up to the camera for the tutor to see. At the end of each session, she reads from the current book.
As an experienced homeschooling mom, my biggest piece of advice is to go slow and limit your expectations to start with. It is better for the kids that they have short, fun sessions as you each learn how to navigate an online learning experience than it is that they have a full O-G session. You may want your first couple sessions to be playing board games (ideas below.) That way your student’s first experience with virtual learning is fun.
We homeschooling moms talk about how we can help everyone who is trying to teach kids at home. School at home is not the same as homeschooling, but the best advice we are collectively coming up with is to say it’s more important to help everyone with their emotions than it is to worry about what they’re learning. Hopefully we’ll be back to more normal learning environments in a few months. At that time, we can start to work on any academic deficiencies. Right now, we need to prioritize helping kids cope with their situations.
USING DECODABLE BOOKS VIRTUALLY
As I mentioned before, you can each have a print copy of the materials you want the child to read or you can screenshare a digital book. (DOG ON A LOG Books are available in Kindle (mobi) format from Amazon and in epub format from many online booksellers.)
FUN PHONICS/READING ACTIVITIES
I have over 120 phonics/dyslexia printables you can download for free. Some can be used via screenshare, other activities/components the child may need to have printed for them. Be creative in how you use them.
FLASHCARDS
Many games can be played with flashcards or you can just hold them up to the camera for the student to read.
Depending on how you’re using them, you may be able to get by with just one set or you and the parents can each download and print the same flashcards. If I don’t have the pre-made flashcards you need, I have blank ones you can customize then email copies to the parents to print. (Or you can print them and send to the child.)
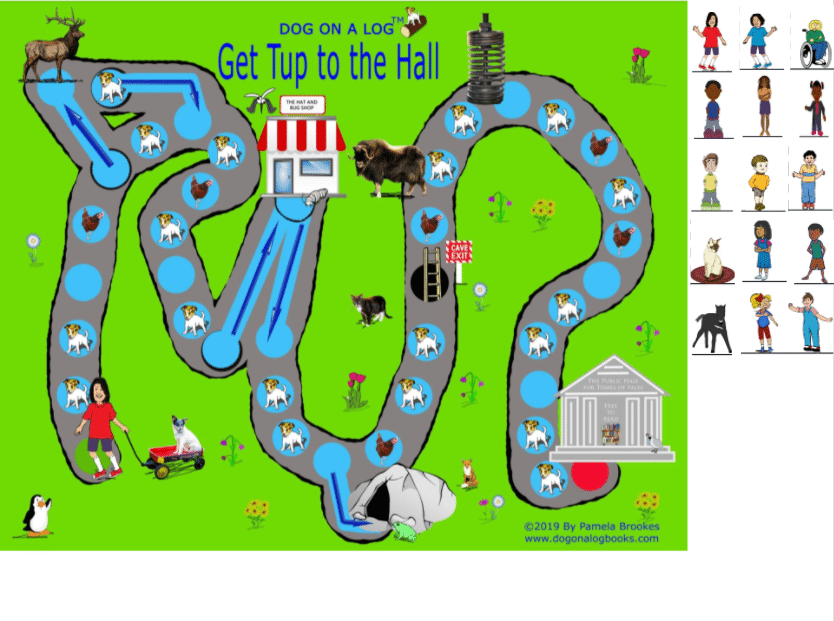
BOARD GAMES
Physical Board:
Parents can download and make the board games. The child can toss the single dice (die) and move the characters for both you and them. They can hold up the flashcards for you to read when it is your turn or you can each have your own stack of flashcards if that is easier.
If it won’t work for the student to have a physical game, it’s possible you can have one and use a device that will share the board on your screens. However, the games as made are pretty large for filming, so you’ll have to see if you can do that or not.
Although you could use a dedicated camera, you can also get by with a smart phone. Clip the phone (or other device) so it is above the game board. You will likely have a feedback loop if the sound is turned on at both your webcam and your game device. I’d recommend muting your webcam so that when you talk, the board game device will show big on your screens if your students are set to highlight whoever is talking.
Digital Board Games:
At our co-op, I taught history courses using various activities including printable board games I bought for the subject. With 11 students, I wasn’t sure how I was going to have everyone see the board game as I didn’t want to set up a camera to video the gameboard. I have photoshop so I came up with the idea to use layers in photoshop so I could move the characters for the kids. My background layer was the gameboard then I made colored tokens as separate layers that would be the game pieces for each student. I set up a partial screenshare so that the gameboards were shared to everyone’s screen.
One time the game had cards that told them what was happening to them and where their piece should move. It was just too complicated to get original game cards to each student, so I selected and read the cards for each of them. I was really afraid that a group of 11 and 12-year-olds would get bored with me moving their pieces and selecting/reading their cards. Fortunately, they loved the game so much that we actually went over our allotted time. Another week their characters were moved based on the roll of a single dice (die.) Some kids had game die that they rolled. If they didn’t have them, then I had one I rolled for them. Again, I was the one moving their pieces (though if there were decisions to be made, the kids made them and I moved their pieces based on their decisions.) That game also was quite popular.
Fortunately, I have since learned how to make an editable, sharable gameboard with Google slides. I have created one for each DOG ON A LOG board game. This will allow you to play a board game virtually with each participant moving their own piece. You’ll still need to print out flashcards and a die (single dice) with 1, 2, 3. You can have the flashcards that you read to your students or you can have the parents print out both Tup reading flashcards and the animal cards for whichever game you’re playing. These can be downloaded for free from my Teachers Pay Teachers Store. See button below.
You can download and print (for free) all the game rules, gameboards, and game pieces here:
Download The Virtual Game Boards From Teachers Pay Teachers Store
Learn How To Make Your Own Virtual Game Here
CARD GAMES
To play a game like “Go Fish” you could have a set of flashcards and your student could have an identical set. The only difference from real life would be that you and the child would have two piles for cards: one for cards you won and one for cards the other person won. You can play many other card games this way.
Virtual learning can be a little awkward at first, but we have found it very effective for both my daughter’s 1:1 tutoring and our homeschool co-op classes.